Friday 26 April 2013

Lemon and Dark Chocolate Coconut Macaroons.

I absolutely adore macroons and this is a great twist on your plain ones. The lemon is subtle, yet delicious and the dark chocolate drizzled on top complements it really well. I was so surprised how quick these are to make, they're great for a snack!

Ingredients:

2 egg whites
80g desiccated coconut
1tsp cornflour
50g caster sugar
1tbsp lemon juice
40g dark chocolate.
 

Method:

1. Preheat the oven to 180º.
2. Beat the egg whites until light and fluffy but not stiff.
3. Fold in the desiccated coconut, cornflour, caster sugar and lemon juice into the beaten egg white.
4. Use a tablespoon to make mounds of the mixture on a greased and lined baking tray, making sure they are well spread out.
5. Bake for 25 minutes or until light golden.
6. Whilst they are cooling, melt your dark chocolate.
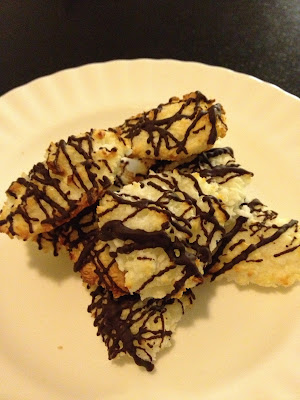
7. Drizzle the melted chocolate over the macaroons.
An alternative to drizzling the chocolate over, you could dip half of it in the melted chocolate such as these...
Image courtesy of The City Sage.
This makes 12 average-sized macaroons. Enjoy!
Cakesfordorothy xoxo


Follow me on bloglovin' to find out when I post new recipes!

Monday 22 April 2013

Queen Cakes/Raisin Cupcakes.

Queen cakes are possibly the first homemade cakes I ever ate. My grandad's neighbour used to make some for every time he would collect me from school (which was at least once a week) so these played a significant part in my childhood. For years I completely forgot about them until recently when I saw them whilst browsing through a recipe book. I knew their unique shape looked familiar and then it clicked. I was surprised at how easy they were to make and how quickly they bake. They have a slightly crunchy outside with a soft and fluffy centre and the chewy raisins/currants bring the textures together very well. There is also a hint of lemon which complements the raisins/currants nicely.

Ingredients:

115g butter
115g caster sugar
2 eggs
6 tsps lemon juice
175g self-raising flour
115g raisins/currants
5 tbsps milk

Method:

1. Preheat the oven to 190º.
2. Put the butter and sugar in a bowl and beat together until light and fluffy.
3. Beat in the eggs, one by one.
4. Beat in the lemon juice with 1 tablespoon of the flour.
5. Fold in the remaining flour using a metal spoon.
6. Stir in the raisins/currants. If you don't like either, you could always use chocolate chips!
7. Gradually mix in up to 5 tablespoons until the mixture is reluctant to fall of the spoon but will do so after a few seconds (this is called a soft dropping consistency).
8. Spoon the mixture into the cupcake cases and bake for 25 minutes or until well risen and golden brown.
9. Allow to cool before eating.
Enjoy!
Cakesfordorothy xoxo


Follow me on bloglovin' to find out when I post new recipes!
Thursday 11 April 2013

Microwave Meringues.

I just love microwave baking. Yes, the great taste of oven-baked food may be compromised but you can have so much fun with it, without baking very much (usually). I was inspired by Ruth at The Pink Whisk to have a go at these crazy creations in the microwave. They looked so easy and fun that I just could not resist!
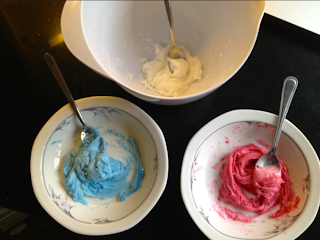
Check the recipe out here! I didn't want to commit to 16 meringues straight away, so I instead used half an egg white and 150g icing sugar. I think added a few drops of vanilla essence for a flavour before splitting the paste into 3 bowls and adding red food colouring to one bowl and blue to another. These would be great for a British-themed tea party or the forthcoming 2nd anniversary of the Duke and Duchess' wedding!

Enjoy!
Cakesfordorothy xoxo


Follow me on bloglovin' to find out when I post new recipes!

Wednesday 10 April 2013

Product Review: Edible Food Pen.

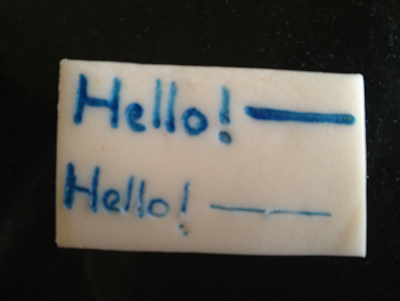
I recently bought this edible food pen from a local cake decorating shop. I was looking for writing icing but they didn't stock any and the lady directed me to this instead. It has two nibs; one is felt-tip style (2.5mm) and the other is like a fine liner (0.5mm). It is just like any normal pen that you would use for writing, you do not need to squeeze it or do anything special. Just write.
2.5mm - felt tip
0.5mm - fine liner
I bought the colour 'royal blue' as the icing I used to make a special cake was a peachy/pinky colour. I felt that it contrasted with the icing enough to be seen but complimented it enough to look good. I really liked using the thicker end as the 0.5mm nib seemed to engrave into the icing, even when writing lightly, and clogging up the nib.
2.5mm nib above, 0.5mm nib below
I practised writing on some left over icing before proceeding onto the actual cake (I highly recommended it) and soon realised that the icing must be left to harden before writing on it otherwise the pen will take the icing with it. The pen dries very quickly and doesn't smudge but the 0.5mm nib leaked all over my hands (I'm not sure if that's just a fault with my pen in particular)! It may also be of interest to you that this product is GM free, Kosher and suitable for vegetarians.
Appearance-wise, I'm satisfied but I feel that writing icing is much better. I think this product would be better suited for writing on cookies or drawing on marzipan, not writing on large cakes. The colour is very pigmented, though, which I like. However, I am looking forward to using this pen again and finding the best ways to use it.

Enjoy!
Cakesfordorothy xoxo


Follow me on bloglovin' to find out when I post new recipes!

Friday 5 April 2013

Bake With Me: Standard Sponge Cake.

As promised a while ago, this is a recipe for your average sponge cake but in picture form!
1. Preheat your oven to 180°C.
2. Grease and line your baking tin(s).
3. Measure out 6oz of butter and beat until pale.
4. Measure out 6oz of caster sugar and combine with butter.
5. Crack one egg into a mug then it add to the butter mixture and combine. Repeat for the other 2 eggs individually.
6. Measure out 6oz of self-raising flour and add to the mixture.
7. Fold the flour in using a wooden spoon.
8. Stir in 2 tsps of vanilla extract. 
9. Finally, spoon the mixture into your greased and lined tin(s) and bake for around 40 minutes.
10. When your cake has turned golden brown and you suspect it is baked, insert a cake tester (or a fork will do). If it is baked properly, it should be clean when you remove it. If it has cake mixture on it then it is not baked. Put the cake back into the oven straightaway to prevent it sinking.

Allow your cake to cool fully before removing it from the tin. For a chocolate cake, simply use 5oz of self-raising flour and 1oz of cocoa power; for a lemon cake, simply substitute the vanilla extract for lemon extract/juice; for a coloured cake, simply add your desired food colouring after the vanilla extract!

Enjoy!
Cakesfordorothy xoxo


Follow me on bloglovin' to find out when I post new recipes!

Tuesday 2 April 2013

Mini Egg Nest Cakes.

As you have probably guessed by now, I'm obsessed with making cakes that are themed. Birthdays, Christmas, Halloween, Valentine's Day and currently Easter! After receiving a packet of mini eggs in an Easter egg and decided to make some nest cakes. Usually, you'd use cornflakes or rice krispies to make nest cakes but we don't eat cereals (only porridge and wheetabix) so I decided to do something slightly different.

Method:

1. Make chocolate cupcakes.
2. Allow to cool and then smother in chocolate butter cream, leaving a little to stick the eggs on at the end.
3. Melt 200g of chocolate (that makes 10 nests).
4. As shown in the picture, draw circles around a mug onto a piece of paper (this is a guide to make sure your chocolate nests are about the right size). Put that onto a baking sheet or board and then sellotape a piece of greaseproof paper on top. 
5. Using a teaspoon, drizzle the melted chocolate on where the circles are drawn.
6. Refrigerate for around an hour.
7. When set, carefully remove the chocolate from the tray and place on top of the cupcakes. 
8. I cut the mini eggs in half because I knew I wouldn't have enough to put on top of all the cakes but if you have enough then leave them whole. Dip one side of the mini egg in leftover butter cream and stick onto the nests.
I found this video quite useful. However, she uses a piping bag to make her nests. I tried this and I found it to be really difficult, messy and it wasted a lot of the chocolate. You have much more control over them if you use a teaspoon! 
Enjoy!
Cakesfordorothy xoxo
Related Posts Plugin for WordPress, Blogger...
 

Template by Suck my Lolly